Thursday, March 3, 2011

How to make a form post request in PERL


The FORM POST is the most common method of transferring data to a web application. On this post, we will have this implement in PERL which is known to be a back-end processing script.

This is really simple, just follow the 3 simple steps below.

1. Install the Perl Library in your server.
  • LWP::UserAgent

2. Initialize user agent and headers.

require LWP::UserAgent;

my $lwpua = LWP::UserAgent->new;

my $user_agent = "Mozilla/5.0 (Windows; U; Windows NT 5.1; en-US; rv:1.8.0.6) Gecko/20060728 Firefox/1.5.0.6";
my @header = ('Referer' => '<domain of where to do post request>',
             'User-Agent' => $user_agent);

3. Execute post request with the Parameters in array form and get the return by calling $object->content.

$response = $lwpua->post('<url of where to do post request>',
                            ['<parameter1>' => '<value1>',
                             '<parameter2>' => '<value2>',
                             '<parameter..n>' => '<value..n>'], @header);

$return = $response->content;

Hope you like it!! Please see code below for the complete implementation of form post request.

#!/usr/bin/perl

require LWP::UserAgent;

use strict;
use warnings;

my $lwpua = LWP::UserAgent->new;

my $user_agent = "Mozilla/5.0 (Windows; U; Windows NT 5.1; en-US; rv:1.8.0.6) Gecko/20060728 Firefox/1.5.0.6";
my @header = ('Referer' => 'http://domain.to.post.com',
             'User-Agent' => $user_agent);

$response = $lwpua->post('http://domain.to.post.com/some.action.page',
                            ['parameter1' => 'value1',
                             'parameter2' => 'value2',
                             'parameter3' => 'value3'], @header);

$return = $response->content;

print "$return\n\ndone!";


1;

Saturday, February 26, 2011

How to create triggers in MYSQL

First of all, before you can create triggers, you should have a privilege to do so. Please contact your database administrator to grant you this privilege.

Once you have the privilege and access to create triggers, next is to know the 3 important terms: trigger_time, trigger_event, and lastly the trigger_body.

trigger_time is the trigger action time. It can be BEFORE or AFTER to indicate that the trigger activates before or after of each trigger event.

trigger_event indicates the kind of statement that activates the trigger. The trigger event can be one of the following:
  • INSERT - The trigger is activated whenever a new row is inserted into the table through INSERT, LOAD DATA, and REPLACE statements.
  • UPDATE - The trigger is activated whenever a row is modified through UPDATE statements.
  • DELETE - The trigger is activated whenever a row is deleted from the table through DELETE and REPLACE statements. Please take note that DROP TABLE and TRUNCATE TABLE statements do NOT activate this trigger, because it doesn't use DELETE.
trigger_event can only be created once per table. Meaning, each table you can create only up to 3 triggers with INSERT, UPDATE, and DELETE event.

trigger_body is the statement to execute when the trigger activates. This is where you put your SQL statements. If you want to execute multiple statements, you should use BEGIN ... END on your SQL syntax, this is likely a normal programming syntax.

Columns are associated with aliases OLD and NEW. The availability of aliases depends on the trigger_event.
  • OLD - can only be use on UPDATE and DELETE event. OLD.column_name
  • NEW - can only be use on INSERT and UPDATE event. NEW.column_name

Example below will create TRIGGER trg_table1_ins that activates BEFORE the insertion happens in table1. We also use DELIMITER to execute multiple lines of SQL statement via MYSQL console.

Let say you have 4 tables: table1, table2, table3, and table4. Each tables has 2 columns: column1 and column2.

delimiter |

CREATE TRIGGER trg_table1_ins BEFORE INSERT ON table1
    FOR EACH ROW BEGIN
        INSERT INTO table2 (column1, column2) VALUES (NEW.column1, NEW.column2);
        DELETE FROM table3 WHERE column1 = NEW.column1;
        UPDATE table4 SET column2 = column2 + 1 WHERE column1 = NEW.column1;
    END;
|

delimiter ;

Since we are using BEFORE as trigger_time and INSERT as trigger_event, the statements between the clause BEGIN and END will be executed before the insertion happens to table1. As a results, table1 will have same data as table 2, records on table3 will be deleted if column1 matches with newly inserted data, and table4 updated its column2 if column1 matches with newly inserted data.

Using BEFORE as your trigger_time will limits you to use AUTO_INCREMENT column, this is because AUTO_INCREMENT will ONLY be generated after you inserted the data. Hence, you should use AFTER. Please see below example.

Let say you have 2 tables: table1 and table5. Each tables have 3 columns: id as AUTO_INCREMENT, column1, and column2.

delimiter |

CREATE TRIGGER trg_table1_ins AFTER INSERT ON table1
    FOR EACH ROW BEGIN
        INSERT INTO table5 (id, column1, column2) VALUES (NEW.id, NEW.column1, NEW.column2);
    END;
|

delimiter ;


Example below will trigger the statement BEFORE the UPDATE happens in table1. You will noticed that I used both NEW and OLD aliases to perform the statements.

delimiter |

CREATE TRIGGER trg_table1_upd BEFORE UPDATE ON table1
    FOR EACH ROW BEGIN
        INSERT INTO table2 (column1, column2) VALUES (NEW.column1, NEW.column2);
        DELETE FROM table3 WHERE column1 = OLD.column1;
        UPDATE table4 SET column2 = NEW.column2 WHERE column1 = OLD.column1;
    END;
|

delimiter ;

Lastly, to have a DELETE event, example below will trigger AFTER the DELETE happens in table1.

delimiter |

CREATE TRIGGER trg_table1_del AFTER DELETE ON table1
    FOR EACH ROW BEGIN
        DELETE FROM table3 WHERE column1 = OLD.column1;
    END;
|

delimiter ;


Tables can be associated with database name which defaults to CURRENT database. Ex. database_name.table_name. You can specify the database name on your trigger_body. This is useful if you wanted to execute your trigger statements on another database. Please see example below.

delimiter |

CREATE TRIGGER trg_table1_ins BEFORE INSERT ON table1
    FOR EACH ROW BEGIN
        INSERT database2.INTO table2 (column1, column2) VALUES (NEW.column1, NEW.column2);
        DELETE FROM database2.table3 WHERE column1 = NEW.column1;
        UPDATE database2.table4 SET column2 = column2 + 1 WHERE column1 = NEW.column1;
    END;
|

delimiter ;


delimiter |

CREATE TRIGGER trg_table1_ins AFTER INSERT ON table1
    FOR EACH ROW BEGIN
        INSERT INTO database2.table5 (id, column1, column2) VALUES (NEW.id, NEW.column1, NEW.column2);
    END;
|

delimiter ;


Hope you like it!!

Resource: dev.mysql.com

Wednesday, February 23, 2011

Exploring Google Static Maps API


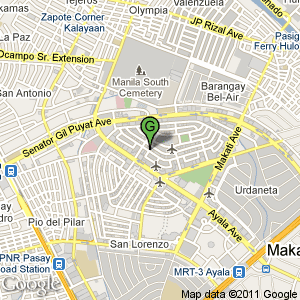
The Google Static Maps API lets you embed a Google Maps image on your webpage without requiring JavaScript or any dynamic page loading. The Google Static Map service creates your map based on URL parameters sent through a standard HTTP request and returns the map as an image you can display on your web page.

The new version Static Maps API v2 will no longer requires a Maps API key which is now open and easy for everybody.

Please see my sample HTTP query string for a Static Map.

http://maps.google.com/maps/api/staticmap?center=14.559041,121.020091&zoom=14&size=300x300&maptype=roadmap&markers=color:blue|label:S|14.559048,121.020095&markers=color:green|label:G|14.559041,121.020091&markers=color:red|color:red|label:C|14.559044,121.020101&sensor=false

URL Parameters:
A Google Static Maps API URL must be of the following form:

http://maps.google.com/maps/api/staticmap?parameter1=value1&parameter2=value2...

Location Parameters:
  • center (required if markers not present) defines the center of the map, equidistant from all edges of the map. This parameter takes a location as either a comma-separated {latitude,longitude} pair (e.g. "14.559041,121.020091") or a string address (e.g. "city hall, new york, ny") identifying a unique location on the face of the earth. For more information, see Specifying Locations for more information.
  • zoom (required if markers not present) defines the zoom level of the map, which determines the magnification level of the map. This parameter takes a numerical value corresponding to the zoom level of the region desired. For more information, see Zoom Levels for more information.

Map Parameters:
  • size (required) defines the rectangular dimensions of the map image. This parameter takes a string of the form valuexvalue where horizontal pixels are denoted first while vertical pixels are denoted second. For example, 500x400 defines a map 500 pixels wide by 400 pixels high. If you create a static map that is 100 pixels wide or smaller, the "Powered by Google" logo is automatically reduced in size.
  • format (optional) defines the format of the resulting image. By default, the Static Maps API creates PNG images. There are several possible formats including GIF, JPEG and PNG types. Which format you use depends on how you intend to present the image. JPEG typically provides greater compression, while GIF and PNG provide greater detail. For more information, see Image Formats.
  • maptype (optional) defines the type of map to construct. There are several possible maptype values, including roadmap, satellite, hybrid, and terrain. For more information, see Static Maps API Maptypes for more information.
  • language (optional) defines the language to use for display of labels on map tiles. Note that this parameter is only supported for some country tiles; if the specific language requested is not supported for the tile set, then the default language for that tile set will be used.

Feature Parameters:
  • markers (optional) define one or more markers to attach to the image at specified locations. This parameter takes a single marker definition with parameters separated by the pipe character (|). Multiple markers may be placed within the same markers parameter as long as they exhibit the same style; you may add additional markers of differing styles by adding additional markers parameters. Note that if you supply markers for a map, you do not need to specify the (normally required) center and zoom parameters. For more information, see Static Map Markers for more information.
  • path (optional) defines a single path of two or more connected points to overlay on the image at specified locations. This parameter takes a string of point definitions separated by the pipe character "|". You may supply additional paths by adding additional path parameters. Note that if you supply a path for a map, you do not need to specify the (normally required) center and zoom parameters. For more information, see Static Map Paths for more information.
  • visible (optional) specifies one or more locations that should remain visible on the map, though no markers or other indicators will be displayed. Use this parameter to ensure that certain features or map locations are shown on the static map.
  • style (optional) defines a custom style to alter the presentation of a specific feature (road, park, etc.) of the map. This parameter takes feature and element arguments identifying the features to select and a set of style operations to apply to that selection. You may supply multiple styles by adding additional style parameters. For more information, see Styled Maps for more information.

Reporting Parameters:
  • sensor (required) specifies whether the application requesting the static map is using a sensor to determine the user's location. This parameter is required for all static map requests. For more information, see Denoting Sensor Usage for more information.

Resource: code.google.com

Sunday, February 20, 2011

How to jailbreak iPad using Greenpoison on Mac.

Greenpoison is one of the latest hacks to jailbreak your iPad to iOS 4.2.1.This article will give you the step by step instructions to do so. Some important points before continuing are mentioned below.

You should jailbreak your iPad at your own risk and it may void your warranty.

Make sure your iPad is updated to at least iOS 4.1 if not iOS 4.2.1.

Make sure to keep your iPad secure after you have jailbroken. Tips to do so are mentioned in the Safety tips article on iPad.net.

These set of instructions are only for Mac users. A windows guide will also be available soon.

It is recommended you perform jailbreaking on a clean restore. If you face problems and you haven’t restored, you can try doing this.

So once you are ready, it’s time to Jailbreak your iPad!

1. Go to the greenpoison website www.greenpois0n.com and download the latest version of greenpoison. It should ideally read as greenpois0n RC5_b3.

2. Once you have downloaded it, click on the zip file and extract the files. Double click on the greenpoison icon to launch the application. The application will open.

3. Connect your iPad to your computer and then switch the iPad off.

4. On the greenpoison application click on the Jailbreak button.

5. You need to get your iPad into the DFU mode. The instructions will be mentioned on the application.

6. First, hold the sleep button for a period of 3 seconds.

7. Then keep holding the sleep/wake button and then press and hold the home button for 10 seconds.

8. Instructions on the application will change based on whether you are doing it correctly.

9. Once the 10 seconds have passed, the instructions will tell you to release the sleep/wake button but continue holding the home button.

10. Once the iPad enters the DFU mode- the jailbreaking process will begin. Make sure you do not release the home button.

11. After the process gets completed you will be told to leave the home button.

12. Then click on the complete button which closes the application. Also, you will see a verbose mode of scrolling on your iPad to indicate the completion of the process.

13. After this your iPad will reboot. Once the iPad switches back on, you will see a new app called as "Loader" on the home screen.

14. Tap on this app and then select Cydia. Install Cydia by tapping on the Cydia button.

15. Once Cydia is installed you may wish to uninstall the Loader application since it is not longer required.

Voila! Your iPad is now jailbroken. Reboot you iPad, then open Cydia and download the latest updates, app and customising options.

Welcome to the wonderful world of Jailbreaking! Enjoy!

Resource: www.ipad.net

Saturday, February 19, 2011

How to make a form post request in PHP using CURL

You can do form post by using CURL in PHP.

As stated below function do_post_request(), you only have 2 parameters to pass on which is $post_url and $post_data. The $post_url is the form action URL where to post the data and the $post_data are the input parameters or data to be posted in a form.

For the $post_data, parameters are delimited by ampersand "&" like query string. Ex. username=...&password=...

This is very simple but very powerful which can really help you doing a back-end processing.

Please see below for the sample POST request.

<?

$post_url = 'http://www.example.com/post-here.php';
$post_data = 'username=myusername&password=mypassword';

do_post_request($post_url, $post_data);

function do_post_request($post_url, $post_data)
{
        $ch = curl_init();
        curl_setopt($ch, CURLOPT_URL, "$post_url");
        curl_setopt($ch, CURLOPT_POSTFIELDS, "$post_data");
        curl_setopt($ch, CURLOPT_POST, 1);
        curl_setopt($ch, CURLOPT_HEADER, 0);
        curl_setopt($ch, CURLOPT_FOLLOWLOCATION, 1);
        curl_setopt($ch, CURLOPT_RETURNTRANSFER, 1);
        curl_setopt($ch, CURLOPT_SSL_VERIFYHOST, 0);
        curl_setopt($ch, CURLOPT_SSL_VERIFYPEER, 0);
        curl_setopt($ch, CURLOPT_USERAGENT, "Mozilla/5.0 (Windows; U; Windows NT 5.1; en-US; rv:1.8.1.3) Gecko/20070309 Firefox/2.0.0.3");
        $response = curl_exec($ch);

        return $response;
}

?>

Leadership 101


  • Leadership demands sacrifices for the near-term to receive lasting benefits. the longer we wait to make sacrifices, the harder they become. Successful people make important decisions early in their life, then manage those decisions the rest of their lives.
  • Growth does not happen by chance. If you want to be sure to grow, you need a plan something strategic, specific, and scheduled. it's a discipline that would need incredible determination from us.
  • Success comes by going the extra mile, working the extra hours, and investing the extra time. The same is true for us. If we want to get to excel in any segment of life, a little extra effort can help. Our efforts can go a long way if we only work a little smarter, listen a little better, push a little harder, and persevere a little longer.
  • Making a difference in your work is not about productivity; it's about people. When you focus on others and connect with them, you can work together to accomplish great things.
  • Envision a goal you'd like to reach. Make it big enough to scare you a little. Now write down a plan for moving toward it. Create mini-goals within the big goal, to set yourself up for continual progress. And include some risks, too. Set yourself up for success.
  • Leaders build margins, not image. A leader may be forced to take unpopular stands for the good of the company. Popularity isn't bad, but decisions made solely on the basis of popular opinion can be devastating. So take courage and make the right though sometimes painful choices.